Menu
Call This Saturday Get $50 Off Today
24 Hour Services
7 Days a Week
Call This Saturday Get $50 Off Today
24 Hour Services
7 Days a Week

Buying or inheriting an old house also means that you will most likely have an old steam heating system coupled with asbestos insulation. We now know that asbestos used to be revered in the past, but we have learned these days that it’s not really the case.

Now, some homeowners of old homes have two choices when it comes to dealing with asbestos: they either wrap it in plastic while others choose to rid of it for good. Some do choose the latter option but there are some things to be remembered when doing so:
But if a homeowner decides to remove asbestos completely, it really needs to be replaced with a suitable type of insulation. Why should this be the case? Well, the last thing you want is to end up with a boiler that is undersized. When this happens, all the rooms in your home will be unevenly heated. In fact, some of them won’t ever get warm enough while others will just be too hot.
This is something you want to avoid because your fuel bills will definitely increase, especially if your thermostat is located in a room that has a cold radiator. The reason your bill will increase is because the burner will run longer than it should have.
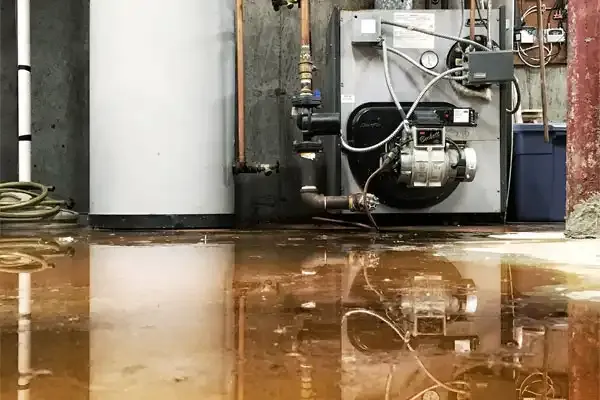
However, insulating your steam pipes makes a whole lot of difference. Let’s present an illustration so you can understand. Let’s say you have a 2-1/2” steel main running in your basement that is about 50 feet long. The previous homeowners covered that main with an inch thick layer of asbestos and that happened to be so many years ago as well. Now, when the basement air is around 70 degrees, heat loss of the main will be around 2,450 BTUs per hour. Basement air is naturally colder than that which means that there is greater heat loss.
Now what happens when insulation is removed from that pipe? Heat loss will increase rapidly to 13, 250 BTUs per hour which is five times the heat loss when the pipe had insulation. This means that if your basement is colder, you will experience much more extreme heat loss. This is also the reason that the basement is naturally cozy although your bedroom is freezing.
This illustrates why steam pipes need to be insulated. And when you don’t know how to do that, let the guide below help you out.
The heating efficiency of a steam system is increased when material is applied to insulate steam pipes. As mentioned earlier, a lot of old homes (as well as older buildings) make use of steam to carry heat from the boiler unit. Sources of heat loss are un-insulated steam pipe distribution and condensate return pipes. However, insulating steam pipes properly can really reduce heat loss by as much as 90%. Not only that, because pipes can get really hot, having insulation can greatly increase safety.
Steam pipes that will be insulated can vary in size – some will be ½ inch in diameter while others can be six inches in diameter. A variety of material can be used to insulate steam pipes as well including polyethylene, neoprene foam and fiberglass. Foil-encased bubble wrap, spray-on ceramic coatings and closed-cell rubber insulation are other kinds of steam pipe insulation products. All this said, the most common material used for insulation is fiberglass, both in commercial and residential settings.
Why is fiberglass used? For one, it is relatively easy to install. And it can also be purchased in insulation sleeves. It is comprised of inorganic fibers bonded with special resin. Also attached is an aluminum-foil facing or vapor retarder. This type of insulation is available in three-foot sections.
Step One: Use the recommended high-temperature tape to seal and secure the fiberglass insulation sleeves. You can also use special fiberglass insulation fitting covers which can be installed on the elbows or tees of a pipe line. Always keep in mind to purchase the proper size so nothing will be wasted.
Step Two: Make sure to identify any problems related to moisture (pipe leaks, malfunctioning valves or tube leaks) before proceeding with a steam pipe insulation project. The integrity of the insulation will be compromised when it gets wet. So make sure that pipes are issue free before embarking on an insulation project.
Step Three: Draw a layout of the pipe to help you out – although not required, having a drawing of the pipe layout can help you as you continue on with the task. Now, you don’t just draw what you see: you also have to use the exact measurements and diameters of the pipes you are insulating. You also need to identify the various fittings (such as tees and elbows) as well as the number of fittings you have to insulate.
Step Four: Pipes get really hot if the system is in operation. This is why you should protect yourself by wearing a high efficiency particulate air respirator, a helmet, work gloves and protective clothing.

$159 See Offer Details (818) 572-9743 Schedule Now $159…
$159 See Offer Details (818) 572-9743 Schedule Now $159…
$159 See Offer Details (818) 572-9743 Schedule Now $159…
$159 See Offer Details (818) 572-9743 Schedule Now $159…
$58/mo See Offer Details (818) 572-9743 Schedule Now $58/mo…
For many people, plumbing is out of sight and therefore out of mind. If you feel that way right now and you want to change things for the better, then you will want to look into a few tips that will help you prevent a nightmare from occurring. A few…
Learn More